Integrate with Azure Active Directory (AAD)
Introduction
Authentication is an essential part of all applications. Casewhere integrates easily with all types of Identity Providers (IdP) that support the SAML 2.0 protocol. This guide shows you how to integrate Casewhere with an Azure AD tenant. There are two ways to do it:
- Use many applications in Azure AD to connect with a Casewhere instance
- Reuse one application in Azure AD to connect with a Casewhere instance
A Casewhere instance includes four main sites:
- Admin site
- Job site
- Worker site
- Worker API site
Regardless of the approach you choose, integrating with Azure AD requires configuring settings on both sides: Azure and Casewhere. This establishes trust between them. Always start by integrating the Admin site with an application in Azure AD first, then integrate the other sites.
Integrate with AAD by using many applications
You need to create three applications to connect three sites in the Casewhere instance: Admin site, Job site, and Worker site.
Admin site
Configure the settings in Azure AD
Register an application for the Admin site
Follow the link below to register an application in Azure AD.
Quickstart: Register an app in the Microsoft identity platform | Microsoft Docs
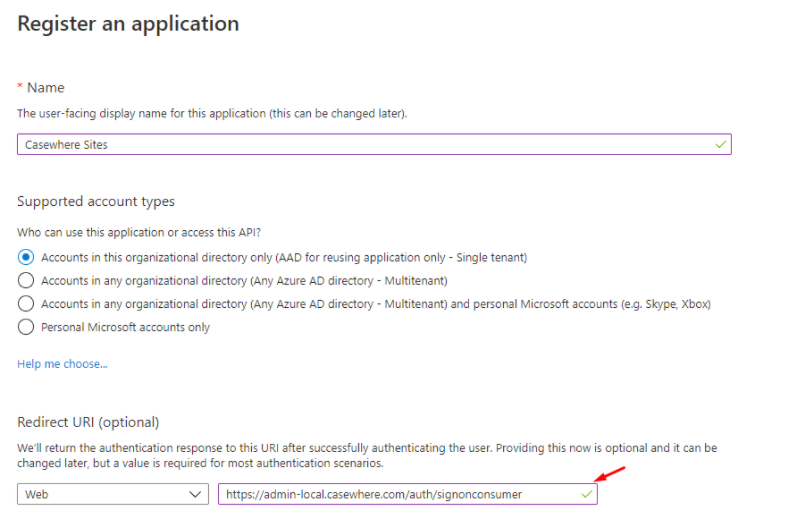
In the Redirect URI (optional) section, enter the link with the format below
https://[admin site domain]/auth/signonconsumer
E.g. https://admin-local.casewhere.com/auth/signonconsumer
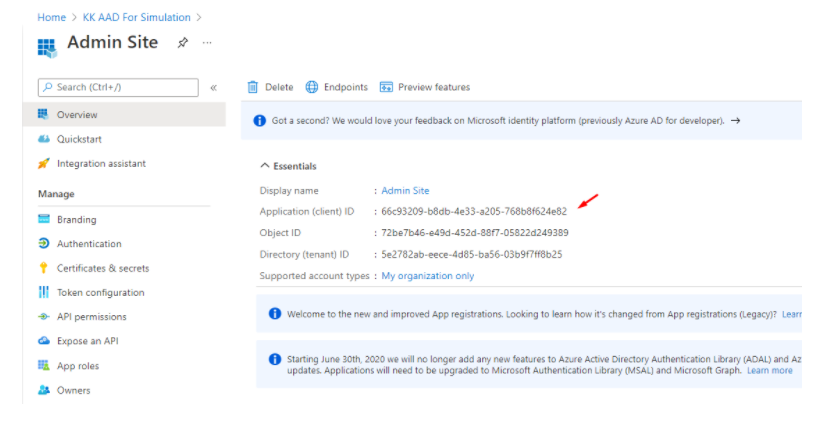
Get the application ID
After creating the application, write down the application ID because it will be used later.
Download the metadata
On the Overview page, click the Endpoints button and get the Federation metadata document link. Then open this link and save it as an XML file.

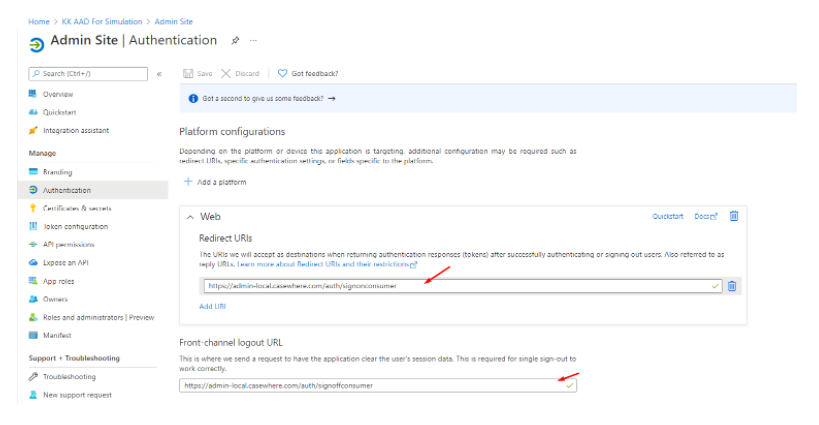
Configure authentication
Select the Authentication menu
Configure Redirect URIs to the Admin site:
https://[admin site domain]/auth/signonconsumer
E.g. https://admin-local.casewhere.com/auth/signonconsumer
Configure Front-channel logout URL to the Admin site
https://[admin site domain]/auth/signoffconsumer
E.g. https://admin-local.casewhere.com/auth/signoffconsumer
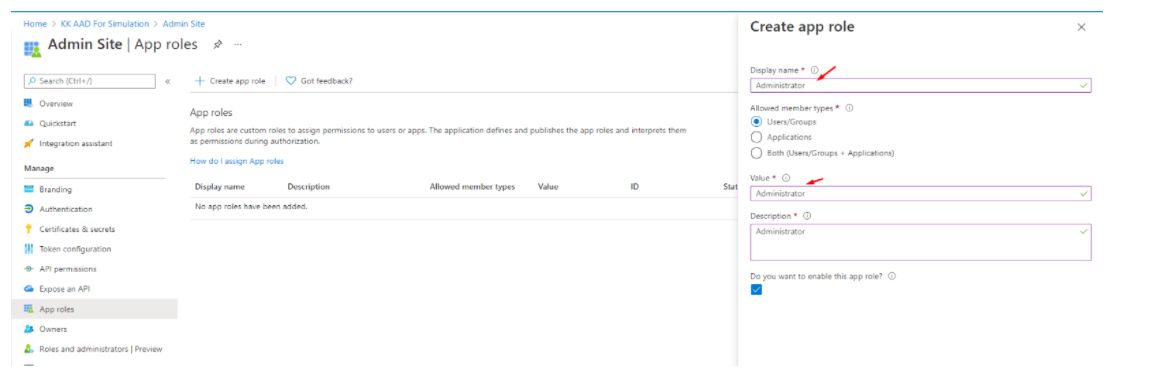
Create App roles in the application
Select the App roles menu
Click the Create app role button
Create a role with the display name = Administrator, the value = Administrator
Select and click the Save button
Select the Users/Groups option in the Allowed member types field
Click the Save button
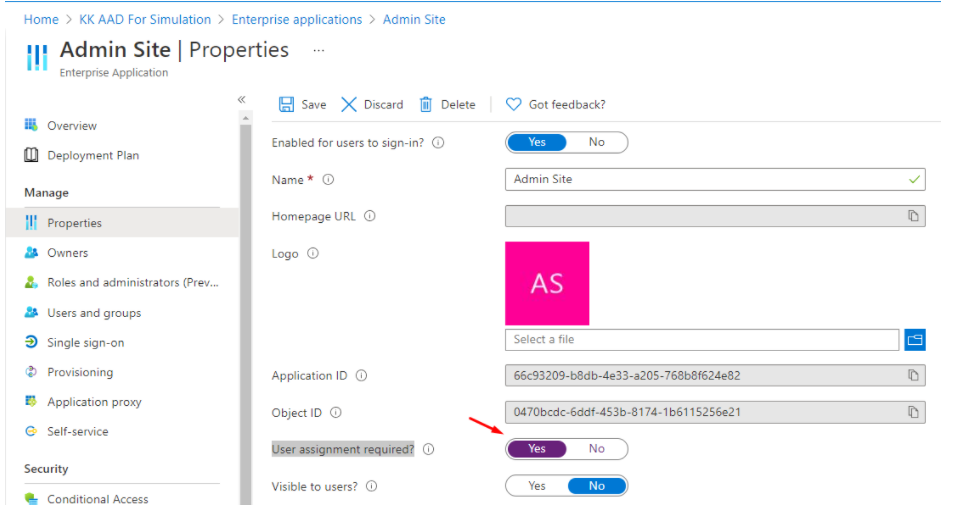
Enable user assignment
Go back to the Overview page of the AAD tenant
Select the Enterprise applications menu
Select the application you created
Select the Properties menu
Check the Yes mode in the User assignment required? field
Click the Save button
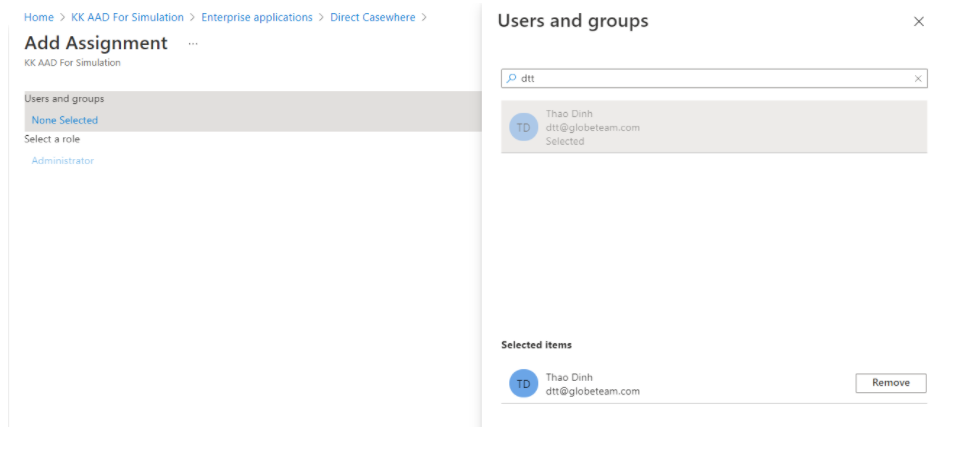
Assign App roles to a user
Assume that there is at least one user in the AAD tenant. If not, follow this link Add or delete users - Azure Active Directory | Microsoft Docs
Go back to the Overview page of the AAD tenant
Select the Enterprise applications menu
Select the application you created
Select the Users and groups menu
Click the Add user/group button
Click the Selected link under the Users section, then select the users you want to assign App roles
Similarly, click the Selected link under Select a role section, then select the Administrator role
Finally, click the Save button
Configure the settings in Admin site
Install public signing certificate
- Open the metadata of the application on the browser like Edge
- Copy the text content of the element EntityDescriptor/Signature/KeyInfo/X509Data/X509Certificate
- Open the text editor like Notepad
- Paste it into the editor
- Save it under the *.cer extension file
On an on-premise environment, install it into the LocalMachine/TrustedPeople location on the host machine. On a cloud environment such as Azure portal, upload it to the App Service. This guide focuses on the on-premise environment.
*Note: Repeat this step for the other sites.
Update metadata
- Navigate to the Casewhere.Configuration.Web folder in the Casewhere instance
- Create a Metadata folder, go into this folder and create an AAD folder
- Then copy the metadata of the application into the AAD folder
Change Web.config in Admin site
You need to change the following settings in the appSettings element of the Web.config file
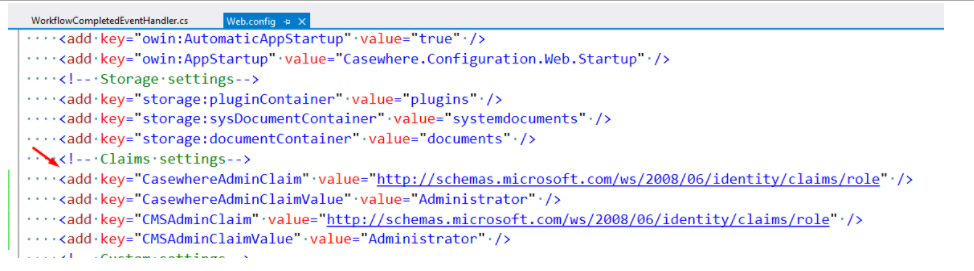
In Claims settings section
- CasewhereAdminClaim: Set it to http://schemas.microsoft.com/ws/2008/06/identity/claims/role
- CasewhereAdminClaimValue: Set it to Administrator
- CMSAdminClaim: Set it to http://schemas.microsoft.com/ws/2008/06/identity/claims/role
- CMSAdminClaimValue: Set it to Administrator
In the IdP Connection section
- idpConnection:IdPUrl: Open the metadata file and get it from the entityID attribute of the EntityDescriptor element

idpConnection:IdPMetadataFolder: Enter the relative path ~/Metadata/AAD
idpConnection:EntityId: Put the application ID of the application in Azure AD into it.
idpConnection:LogoutResponseUri: Put the sign-off endpoint of the Worker API site. It looks like
https://[admin site domain]/auth/signoffconsumer
E.g. https://admin-local.casewhere.com/auth/signoffconsumer
Job site
Similar to the Admin site, you need to configure both sides.
Configure the settings in Azure AD
Register an application for the Job site
Create another application in Azure AD to work with the Job site. In the Redirect URI (optional) section, enter the link with the format below
https://[job site domain]/auth/signonconsumer
E.g. https://job-local.casewhere.com/auth/signonconsumer
Then, go to the Overview menu and write down the application ID because it will be used later. Next, click the Endpoints button and get the Federation metadata document link and download the metadata file.
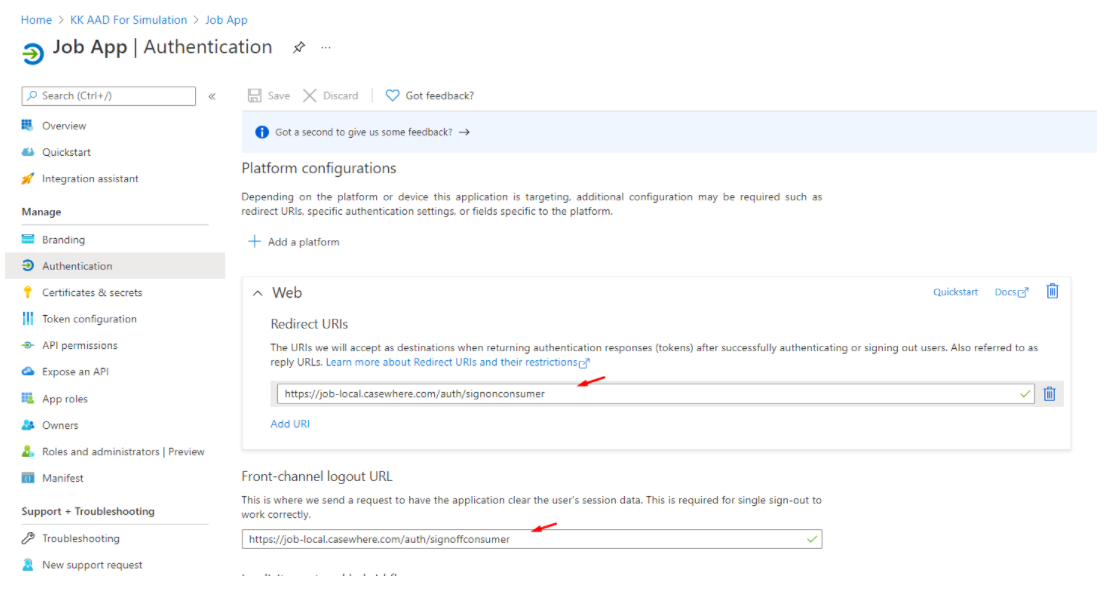
Configure authentication
Select the Authentication menu
Configure Redirect URIs for the Job site
https://[job site domain]/auth/signonconsumer
E.g. https://job-local.casewhere.com/auth/signonconsumer
Configure Front-channel logout URL to Job site
https://[job site domain]/auth/signoffconsumer
E.g. https://job-local.casewhere.com/auth/signoffconsumer
 \
\
Then, follow the steps in the Admin site section and apply them to the new application:
- Create App roles in the application
- Enable user assignment
- Assign App roles to a user
Configure the settings in Job site
Install public signing certificate
Similar to the Admin site
Update metadata
- Navigate to the Casewhere.Hangfire folder
- Create a Metadata folder, go into this folder and create an AAD folder
- Then copy the metadata of the application into the AAD folder
Change Web.config in Job site
You need to change the following settings in the appSettings element of the Web.config file
In Claims settings section
- CasewhereAdminClaim: Set it to http://schemas.microsoft.com/ws/2008/06/identity/claims/role
- CasewhereAdminClaimValue: Set it to Administrator

In the IdP Connection section
- idpConnection:IdPUrl: Open the metadata xml file and get the value of the entityID attribute of the EntityDescriptor element
- idpConnection:IdPMetadataFolder: Enter the relative path ~/Metadata/AAD
- idpConnection:EntityId: Put the application ID into it.
- idpConnection:LogoutResponseUri: Put the sign-off endpoint of the Worker API site. It looks like
https://[job site domain]/auth/signoffconsumer
E.g. https://job-local.casewhere.com/auth/signoffconsumer
Worker site
You need to use the Worker API site to perform the configuration
Configure the settings in Azure AD
Register an application for the Worker site
Create another application in Azure AD to work with the Worker site. In the Redirect URI (optional) section, enter the link with the format below
https://[worker api domain]/signonconsumer
E.g. https://api-local.casewhere.com/signonconsumer
Then, go to the Overview menu and write down the application ID because it will be used later. Next, click the Endpoints button and get the Federation metadata document link and download the metadata file.
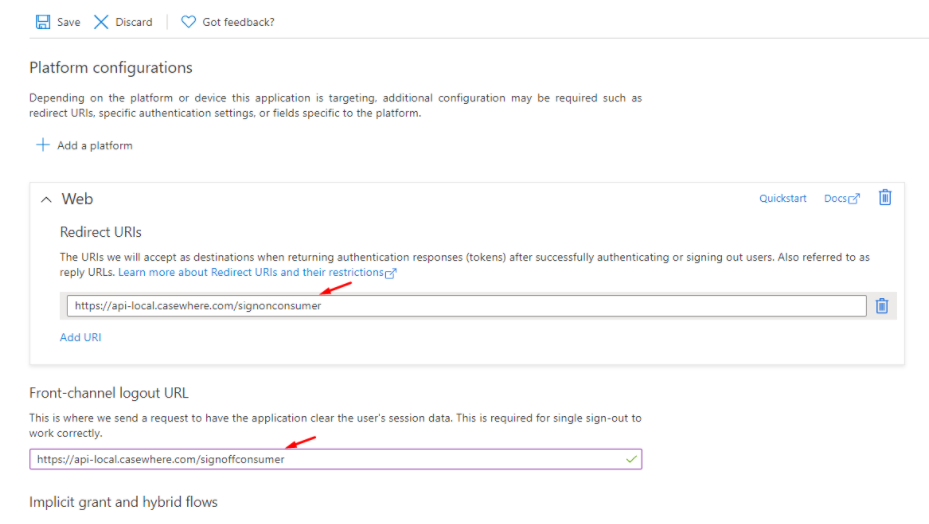
Configure authentication
Select the Authentication menu
Configure Redirect URIs for the Worker API site
https://[worker api site domain]/signonconsumer
E.g. https://api-local.casewhere.com/signonconsumer
Configure Front-channel logout URL for the Worker API site
https://[worker api site domain]/signoffconsumer
E.g. https://api-local.casewhere.com/signoffconsumer
Next, follow the steps in the Admin site section and apply them to the new application:
- Create App roles in the application
- Enable user assignment
- Assign App roles to a user
Configure the settings in Worker site
The steps below assume that you can log in to the Admin site successfully.
Install public signing certificate
Similar to the Admin site
Create an IdP Connection
Navigate to the IdP Connections menu
Click the Create button, choose the SAML 2.0 option
In the Name field, enter the name like Login Azure For API
In the Signing Certificate Thumbprint field, enter the thumbprint of the Casewhere signing certificate (Ask NTU if you need the support)
In the IdPUrl field, enter the link you get from the value of the entityID attribute of the EntityDescriptor element when you open the metadata of the application.
Upload the metadata file from Azure AD into the Metadata field
In the Claim Mapping section,
UserId: http://schemas.microsoft.com/identity/claims/objectidentifier
Username: http://schemas.xmlsoap.org/ws/2005/05/identity/claims/name
Roles: http://schemas.microsoft.com/ws/2008/06/identity/claims/role
- Finally save it.
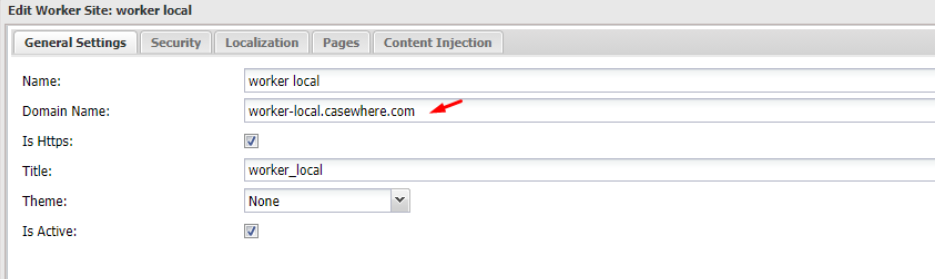
Create a public worker site
- Navigate to the Worker Sites menu, click the Create button
- In the Name field, enter a suitable name in the business context, like CPK Caseworker site
- In the Domain Name field, enter the domain of that site.
E.g. worker-local.casewhere.com
- In the Theme field, select a theme or None
- Check Is active field
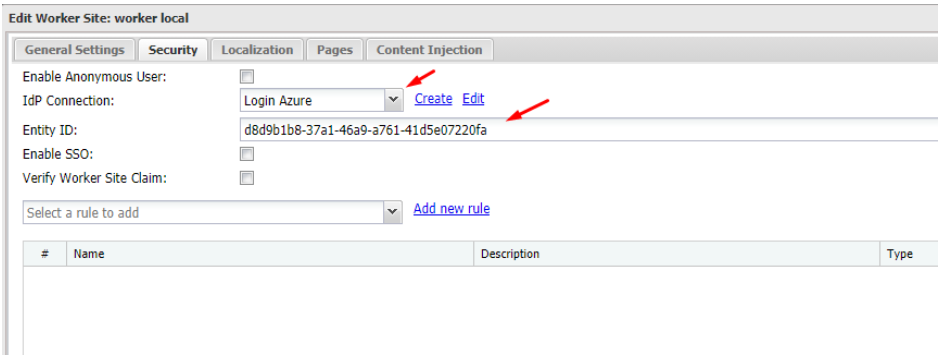
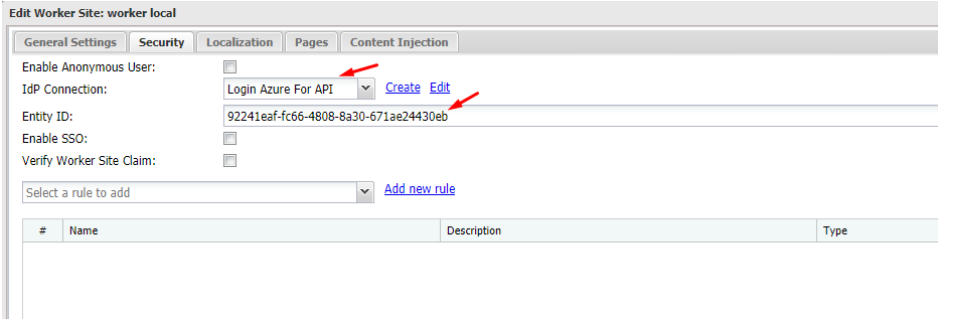
Go to the Security tab, select the Login Azure For API option in the IdP Connection dropdown
In the Entity ID field, enter the application ID
Uncheck the Verify Worker Site Claim checkbox
Click the Save button
Integrate with AAD by reusing a single application
Configure the settings in Azure AD
Register an application for all Casewhere sites
Create an application in Azure AD to work with all sites of the Casewhere instance. In the Redirect URI (optional) section, enter the link with the format below
https://[admin site domain]/auth/signonconsumer
E.g. https://admin-local.casewhere.com/auth/signonconsumer
Then, go to the Overview menu and write down the application ID because it will be used later. Next, click the Endpoints button and get the Federation metadata document link and download the metadata file.
Configure authentication
Select the Authentication menu
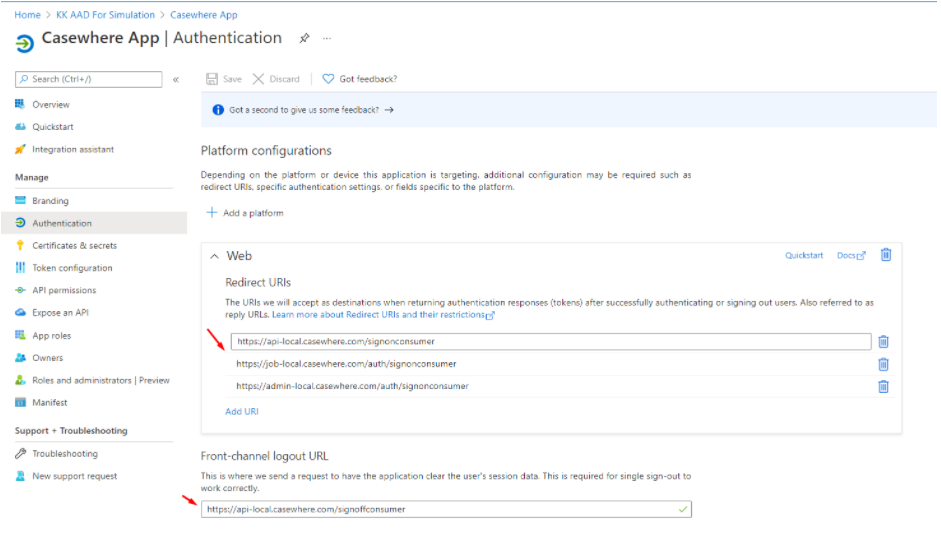
Configure Redirect URIs for the three sites in the Casewhere instance. See the image below for reference.
Admin site: https://[admin site domain]/auth/signonconsumer
Job site: https://[job site domain]/auth/signonconsumer
Worker API site: https://[worker api site domain]/signonconsumer
Configure Front-channel logout URL and you must use the domain of Worker API
Worker API site: https://[worker api site domain]/signoffconsumer
Then, follow the steps in the Admin site section and apply them to the new application:
- Create App roles in the application
- Enable user assignment
- Assign App roles to a user
Configure the settings for three sites in Casewhere
Install public signing certificate
Similar to the Admin site.
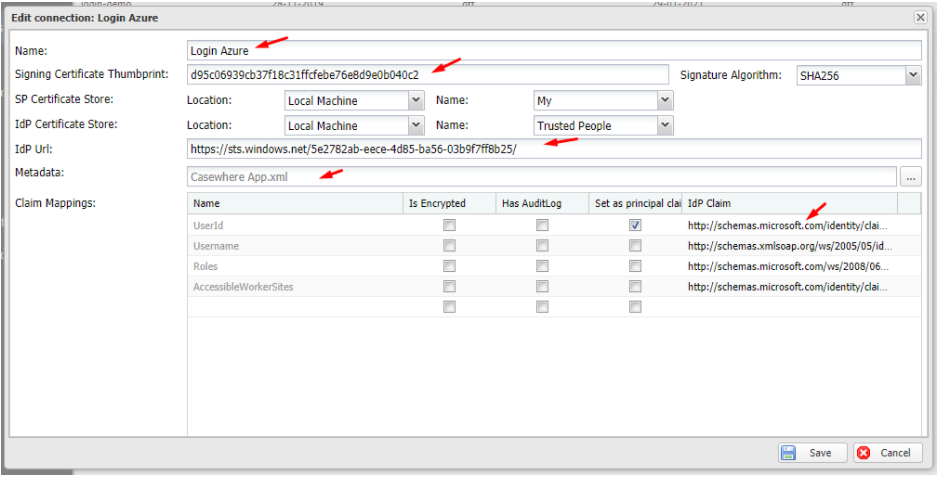
Create an IdP connection
Navigate to the IdP Connections menu
Click the Create button, choose the SAML 2.0 option
In the Name field, enter the name like Login Azure
In the Signing Certificate Thumbprint field, enter the thumbprint of the Casewhere signing certificate
In the IdPUrl field, enter the link you get from the entityID attribute of the EntityDescriptor element when you open the metadata of the application. For example,
Upload the metadata of the application into the Metadata field
In the Claim Mapping section,
Finally save it.
Next, you need to change the settings for the specific sites in Casewhere. Make sure you can access the folder that contains the Casewhere instance.
Configure the settings for the Admin site
Update metadata
Navigate to the Casewhere.Configuration.Web folder
Create a Metadata folder, go into this folder and create an AAD folder
Then copy the metadata of the application into the AAD folder
Change the settings in Web.config
Change the following settings in the appSettings element of the Web.config file
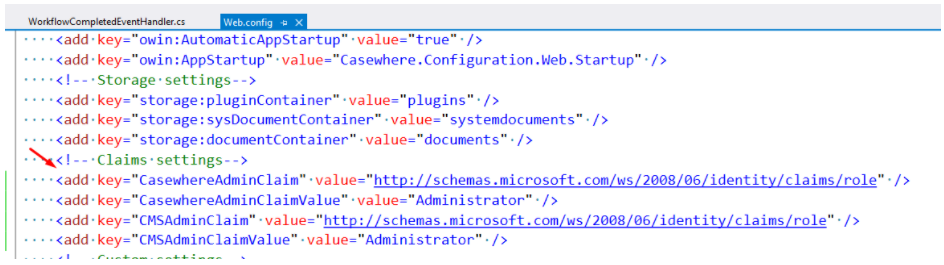
In Claims settings section
- CasewhereAdminClaim: Set it to http://schemas.microsoft.com/ws/2008/06/identity/claims/role
- CasewhereAdminClaimValue: Set it to Administrator
- CMSAdminClaim: Set it to http://schemas.microsoft.com/ws/2008/06/identity/claims/role
- CMSAdminClaimValue: Set it to CMSAdmin
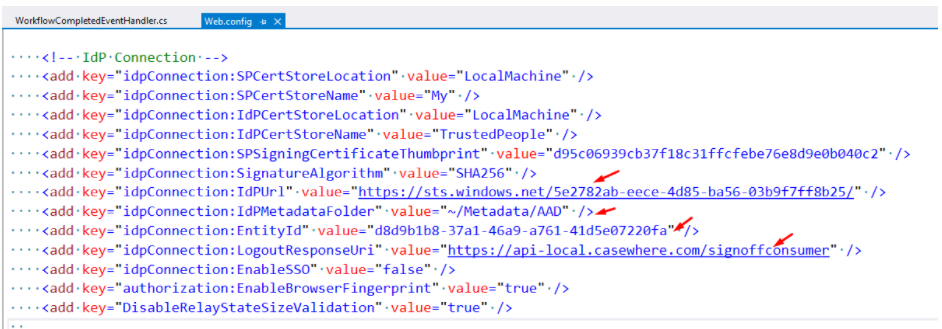
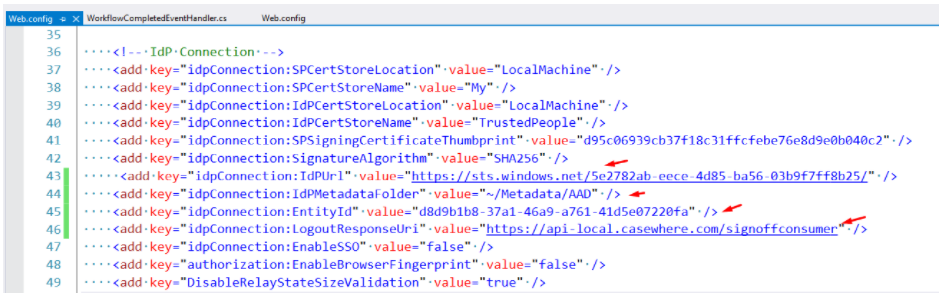
In the IdP Connection section
- idpConnection:IdPUrl: Open the metadata file and get the value of the entityID attribute in the EntityDescriptor element

idpConnection:IdPMetadataFolder: Enter the relative path ~/Metadata/AAD
idpConnection:EntityId: Put the application ID into it.
idpConnection:LogoutResponseUri: Put the sign-off endpoint of the Worker API site. It looks like
https://[worker api site domain]/signoffconsumer
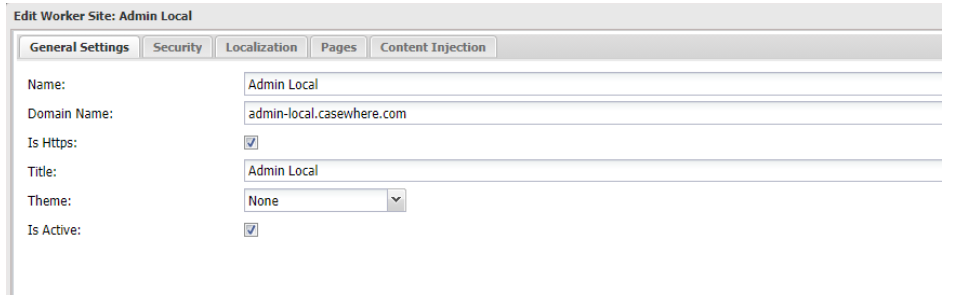
Create an internal worker site for the Admin site
This worker site is used to support the logout action.
Navigate to the Worker Sites menu, click the Create button
In the Name field, enter a suitable name in the business context, like CW Admin site
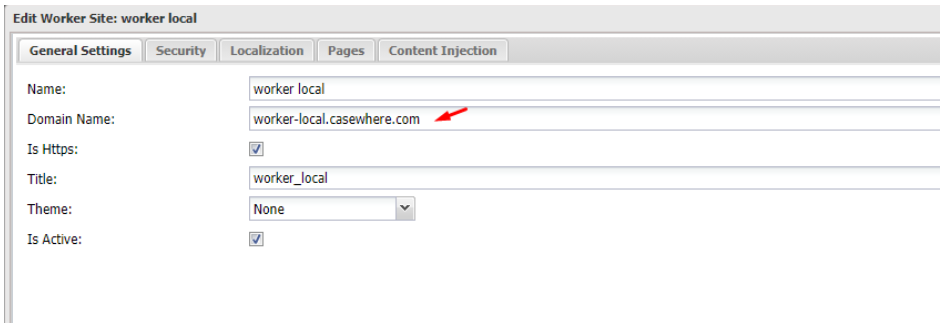
In the Domain Name field, enter the domain of the Admin site.
E.g. admin-local.casewhere.com
In the Theme field, select a theme or None
Check Is active field
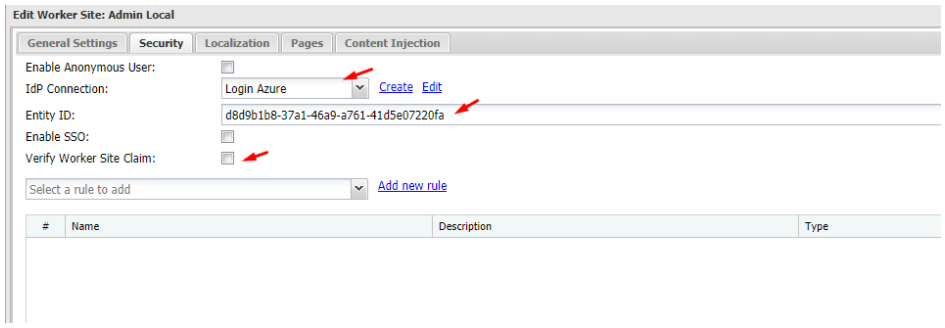
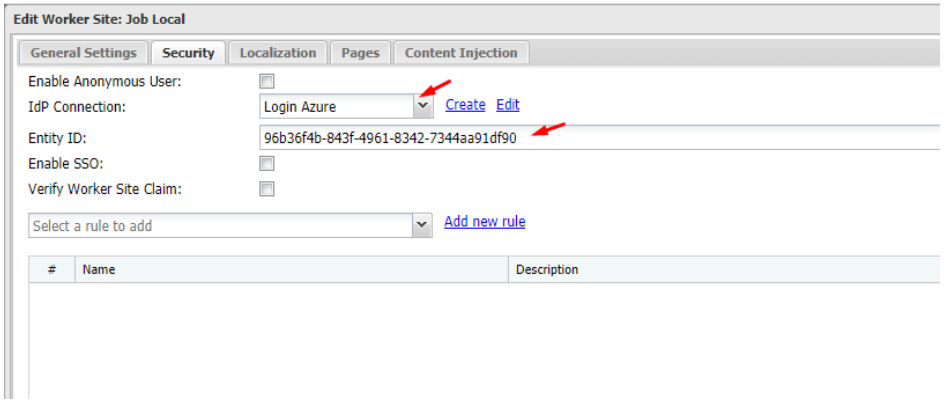
Go to the Security tab, select the Login Azure option in the IdP Connection dropdown
In the Entity ID field, enter the application ID
Uncheck the Verify Worker Site Claim checkbox
Click the Save button
Configure the settings for the Job site
Update metadata
- Navigate to the Casewhere.Hangfire folder
- Create a Metadata folder, go into this folder and create an AAD folder
- Then copy the metadata of the application into the AAD folder
Change the settings in Web.config
Change the following settings in the appSettings element of the Web.config file
In Admin Roles section
- CasewhereAdminClaim: Set its value to http://schemas.microsoft.com/ws/2008/06/identity/claims/role
- CasewhereAdminClaimValue: Set its value to Administrator

In the IdP Connection section
idpConnection:IdPUrl: Open the metadata file and get it from the entityID attribute of the EntityDescriptor element
idpConnection:IdPMetadataFolder: Enter the relative path ~/Metadata/AAD
idpConnection:EntityId: Put the application ID into it.
idpConnection:LogoutResponseUri: Put the sign-off endpoint of the Worker API site. It looks like
https://[worker api site domain]/signoffconsumer
E.g. https://api-local.casewhere.com/signoffconsumer
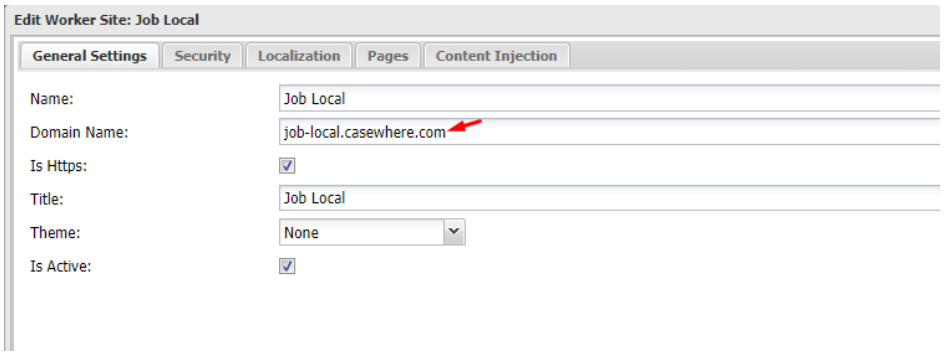
Create an internal worker site for the Job site
This worker site is used to support the logout action.
Navigate to the Worker Sites menu, click the Create button
In the Name field, enter a suitable name in the business context, like Job Local
In the Domain Name field, enter the domain of the job site.
E.g. job-local.casewhere.com
In the Theme field, select a theme or None
Check Is active field
- Go to the Security tab, select the Login Azure option in the IdP Connection dropdown
- In the Entity ID field, enter the application ID
- Uncheck the Verify Worker Site Claim checkbox
- Click the Save button
Configure the settings for Worker site
Create a public worker site
Navigate to the Worker Sites menu, click the Create button
In the Name field, enter a suitable name in the business context, like CPK Caseworker site
In the Domain Name field, enter the domain of that site.
E.g. worker-local.casewhere.com
In the Theme field, select a theme or None
Check Is active field
Go to the Security tab, select the Login Azure option in the IdP Connection dropdown
In the Entity ID field, enter the application ID
Uncheck the Verify Worker Site Claim checkbox
Click the Save button