Workflow navigation - More examples
Introduction
The purpose of this article is to bring up more examples about how the Casewhere workflow navigation is set up in proportion to the project business rules. We also describe other logic configurations relating to the workflow navigation in this article.
Examples
Example 1 - Register new account
The Registration flow is used to register new account by any new user. The business flow includes 3 steps: "Select account types", "Fill registration form", and "Return results" which are in proportion to 3 steps in Casewhere workflow. The flow starts when a user opens the Register form.
Diagram describing the business rule:

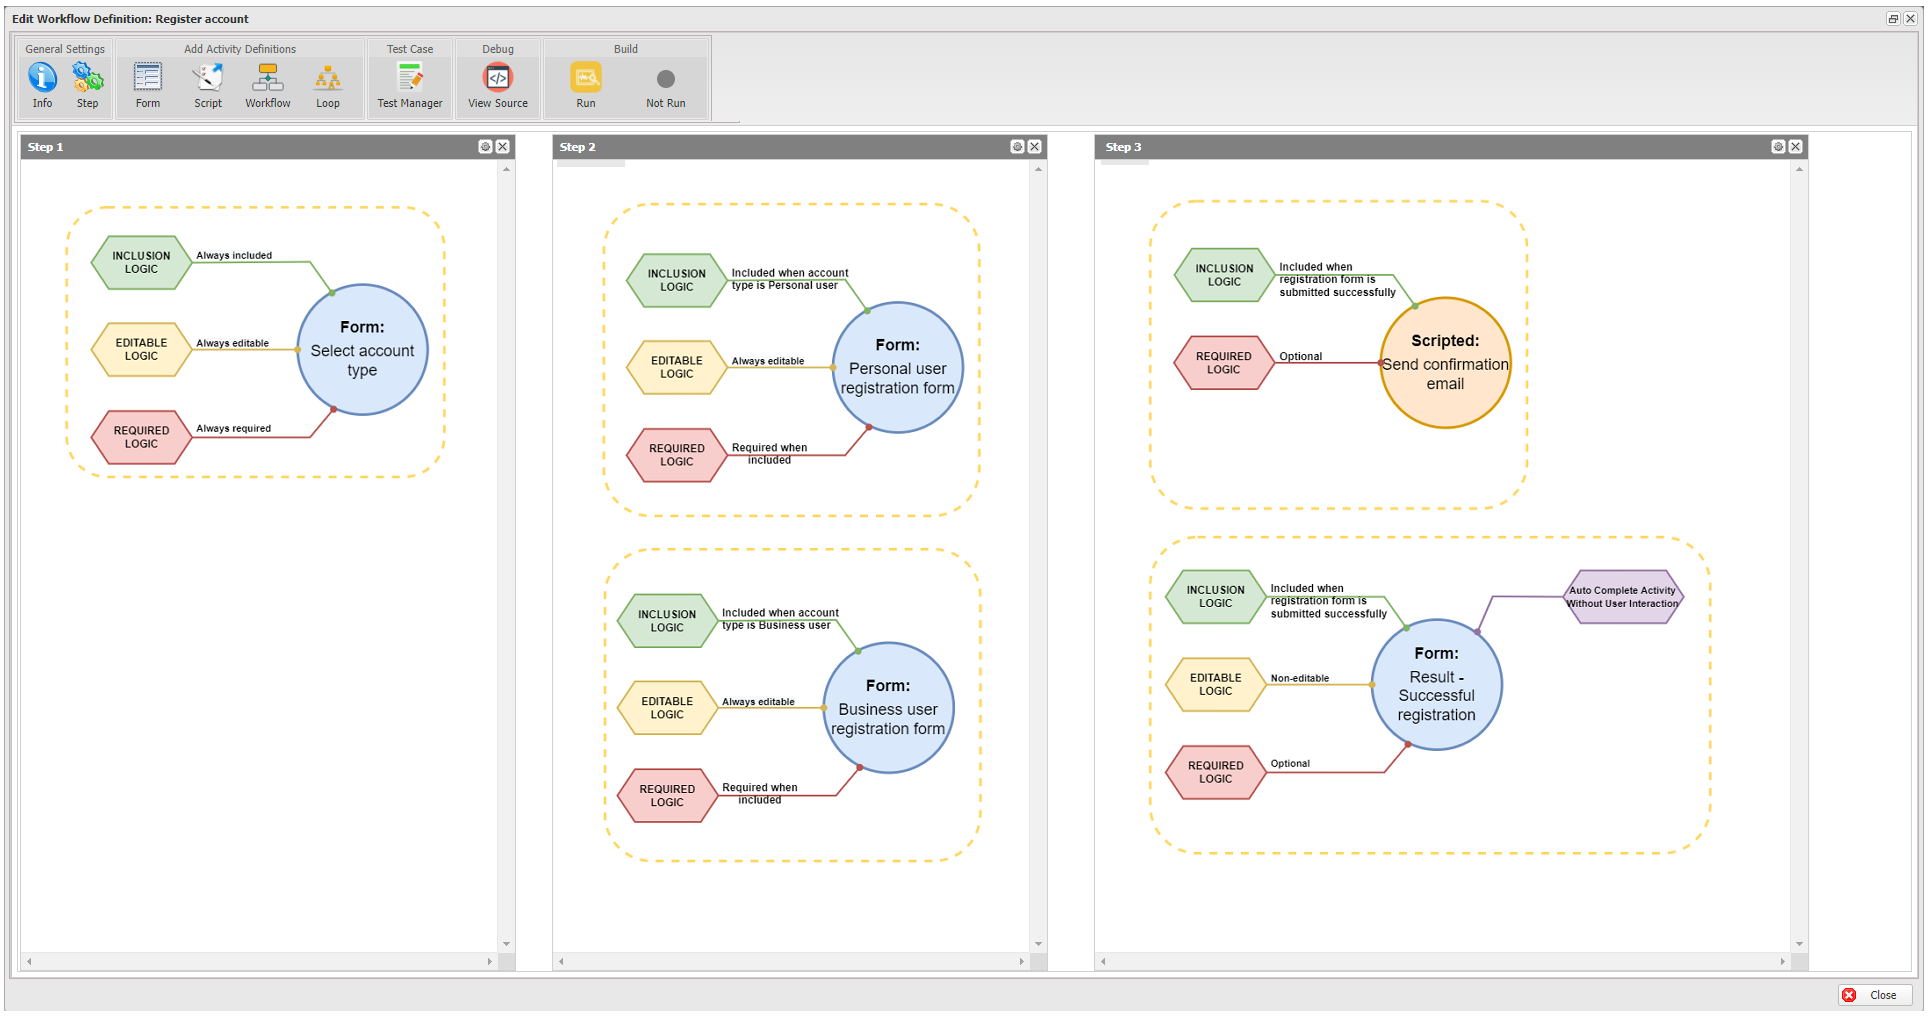
Workflow definition in Casewhere:

Step 1 - Select account types
First of all, a user must select the account type s/he want to register: Personal user or Business user. This flow is handled in Step 1 of Casewhere workflow with the form activity called Select account type. In this activity, the logic configurations are as below:
Inclusion logic: At this step, the user must define which account type s/he wants to register, so the activity must be included. Then, the Inclusion logic here is Always included.
Editable logic: The user can edit the account type, so the form must be editable. Then, the Editable logic is Always editable
Required logic: The user must complete the form to go to the next step. Then, the Required logic is Always required
Step 2 - Fill registration form
After step 1 is completed, based on the selected account type, the corresponding form will be opened. In Step 2 of Casewhere workflow, there are 2 form activities handling this business rule: Personal user registration form, Business user registration form. The logic configurations are as below
Form: Personal user registration
- Inclusion logic: The form is only opened when the selected account type is Personal user, so the Inclusion logic is Included when account type is Personal user
- Editable logic: The user can edit this form, so the Editable logic is Always editable
- Required logic: When the form is displayed, the user must complete the form to go to the next step. Then, the Required logic is Required when included
Form: Business user registration
- Inclusion logic: The form is only opened when the selected account type is Business user, so the Inclusion logic is Included when account type is Business user
- Editable logic: The user can edit this form, so the Editable logic is Always editable
- Required logic: When the form is displayed, the user must complete the form to go to the next step. Then, the Required logic is Required when included
Step 3 - Return results
After the user submits the registration form, the result page will be opened and a confirmation email will be sent to the user. This part will be handled in Step 3 of Casewhere workflow with 1 scripted activity called Send confirmation email and 1 form activity called Result-Successful registration. The logic configurations are as below
Script: Send confirmation email
- Inclusion logic: The script is run to send email to the user immediately after the user submits the registration successfully. Therefore, the Inclusion logic is Included when registration form is submitted successfully.
- Required logic: This step is the ending step, it is not required to complete to go to next step. Therefore, the Required logic is Optional
Form: Result-Successful registration
- Inclusion logic: The form is only opened when the registration form is submitted successfully, so the Inclusion logic is Included when registration form is submitted successfully
- Editable logic: The user cannot edit this form, so the Editable logic is Non-editable
- Required logic: When the form is displayed, it is the ending step, it is not required to complete to go to the next step. Then, the Required logic is Optional
- Completion Logic: When the form is displayed, it means the flow has ended, the user does not need to make any interaction to complete the flow. Therefore, the Completion Logic is Auto complete activity without user interaction
Example 2 - Add product to Cart and Check out
This flow is about the process of adding products to the cart and checkout that is often used in the e-commerce product. The business flow includes 4 steps: "Add product to cart", "Open Cart details", "Checkout", and "Returned result" that are in proportion to 4 steps in Casewhere workflow. The flow starts when a user opens the Product detail page.
Diagram describing the business rule:

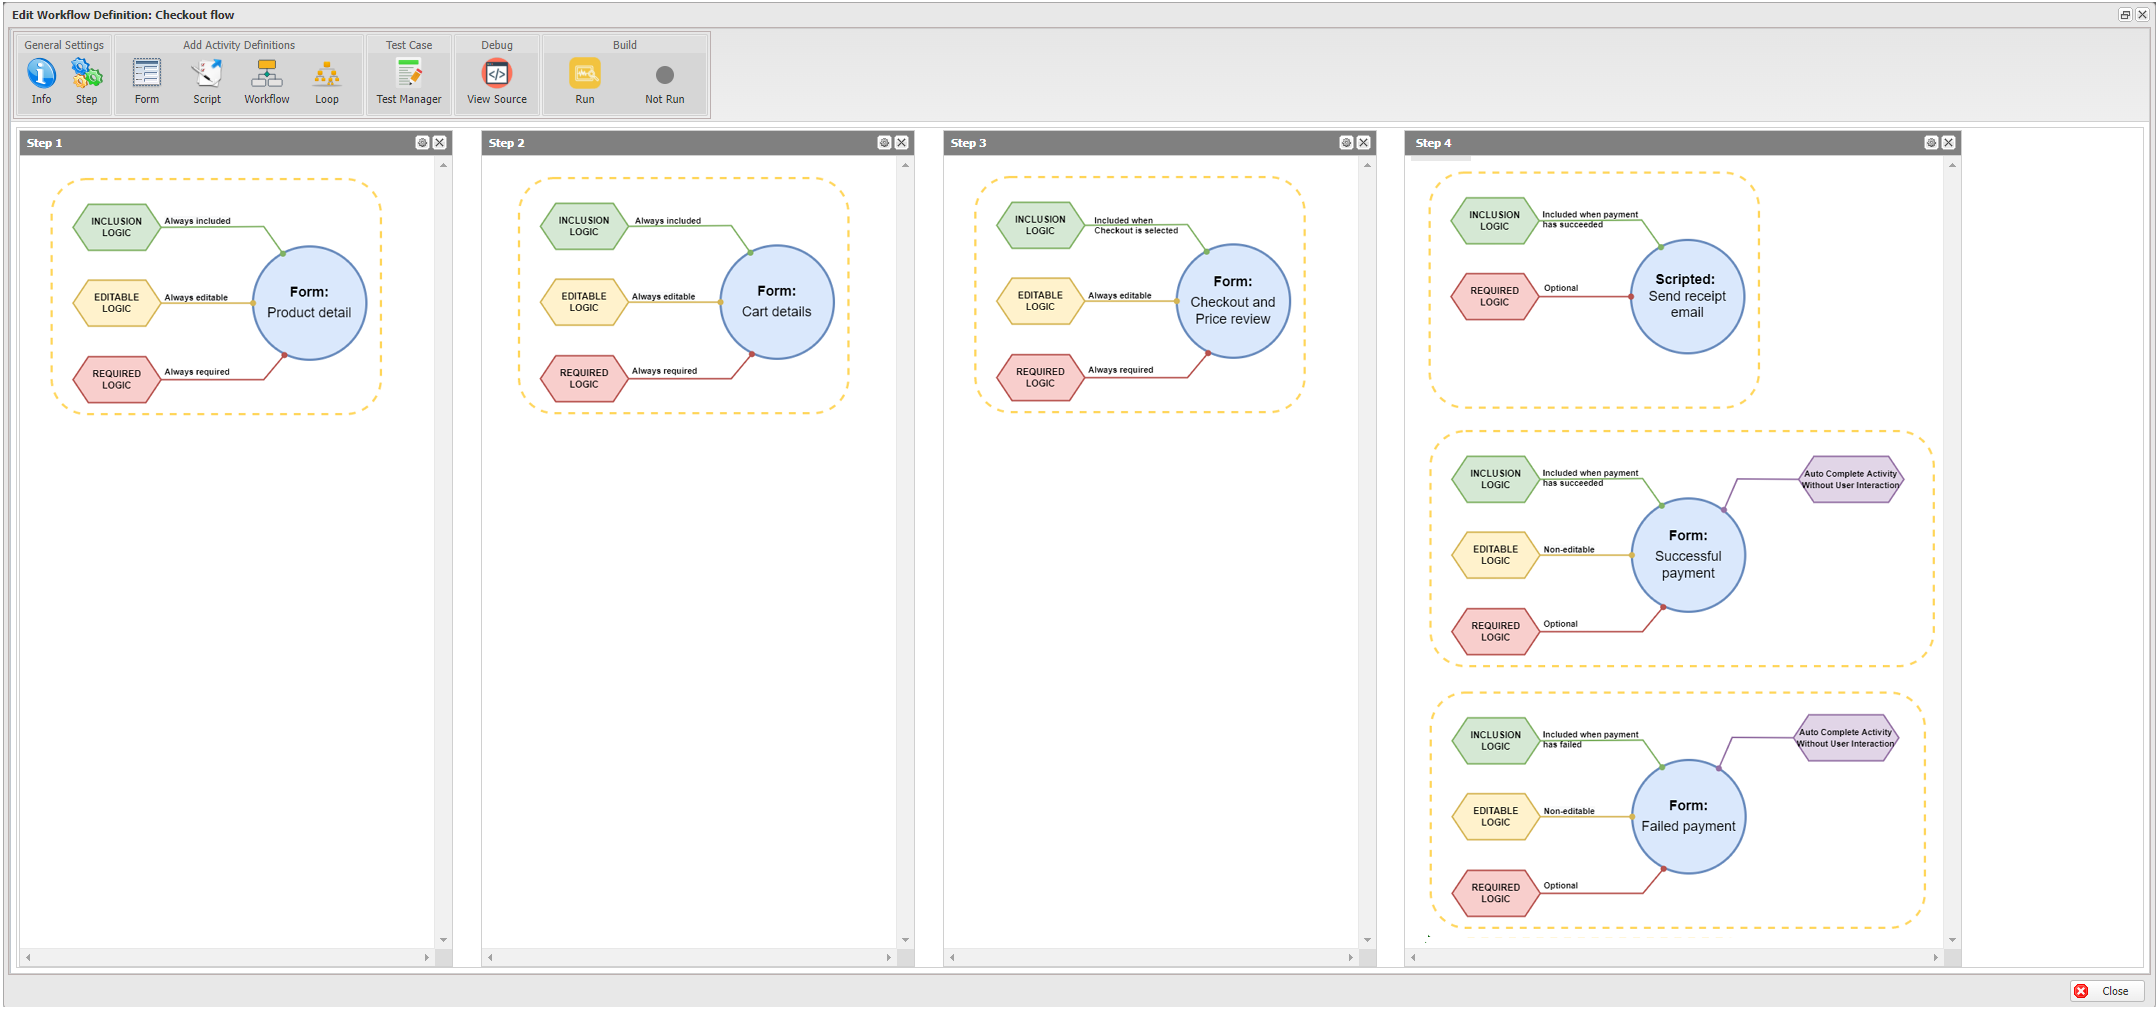
Workflow definition in Casewhere:

Step 1 - Add product to cart
At first, the user must access the Product detail page to add product to cart. This step is handled in Step 1 of Casewhere workflow with the Form activity called Product detail. In this activity, the logic configurations are as below:
Inclusion logic: To add product to cart and go to the next steps, the user must access the Product detail page at first. Therefore, this activity must be included, and the Inclusion logic is Always included.
Editable logic: The user can edit the amount of product to add to cart, so the form must be editable. Then, the Editable logic is Always editable
Required logic: The user must add product to cart before go to the step of viewing cart details and checkout. Then, the Required logic is Always required
Step 2 - Open Cart details
After products were added to cart meaning step 1 has completed, the user must go to Cart details page to continue the flow. This step is handled in Step 2 of Casewhere workflow with 1 form activity called Cart details . The logic configurations are as below
- Inclusion logic: To go to the next step of checkout, the user must access the Cart details page , so the Inclusion logic is Always included
- Editable logic: The user can remove or edit amount of product in Cart details page, so the Editable logic is Always editable
- Required logic: The user must complete the changing on Cart details page to be able to go to the Checkout step. So, the Required logic is Always required
Step 3 - Checkout:
After the user selects to checkout the products in Cart details page, the Checkout page will be opened that allows the user to review the total price and list of checkout products. This step is handled in Step 3 of Casewhere workflow with 1 form activity called Checkout. The logic configurations are as below
- Inclusion logic: This activity is only included when the user clicks on Checkout button on the Cart details page. So the Inclusion logic is Included when Checkout is selected
- Editable logic: The user can apply coupon or changing delivery address on this page, so the Editable logic is Always editable
- Required logic: This activity must be completed before moving to the payment process. So, the Required logic is Always required
Step 4 - Return results
After the step of Checkout, the payment process will be handled by a third party. The payment result will be returned from the third party and Casewhere will handle the next actions based on the payment result with 1 scripted activity called Send receipt email and 2 form activities called Successful payment, Failed payment. The logic configurations are as below
Script: Send receipt email
- Inclusion logic: The script is run to send email to the user after Casewhere receives the successful payment notification . Therefore, the Inclusion logic is Included when payment has succeeded
- Required logic: This step is the ending step, it is not required to complete to go to next step. Therefore, the Required logic is Optional
Form: Successful payment
- Inclusion logic: The form is only opened after Casewhere receives the successful payment notification, so the Inclusion logic is Included when payment has succeeded
- Editable logic: The user cannot edit this form, so the Editable logic is Non-editable
- Required logic: When the form is displayed, it is the ending step, it is not required to complete to go to the next step. Then, the Required logic is Optional
- Completion Logic: When the form is displayed, it means the flow has ended, the user does not need to make any interaction to complete the flow. Therefore, the Completion Logic is Auto complete activity without user interaction
Form - Failed payment
- Inclusion logic: The form is only opened after Casewhere receives the failed payment notification, so the Inclusion logic is Included when payment has failed
- Editable logic: The user cannot edit this form, so the Editable logic is Non-editable
- Required logic: When the form is displayed, it is the ending step, it is not required to complete to go to the next step. Then, the Required logic is Optional
- Completion Logic: When the form is displayed, it means the flow has ended, the user does not need to make any interaction to complete the flow. Therefore, the Completion Logic is Auto complete activity without user interaction
Example 3 - Evaluate registration application
This flow is about the function of evaluating the applications of the external user via the flow of Register new account. This flow is often used in the admin worker site. The business flow includes 3 steps: "Evaluate an application (Approve or Reject the application)", "Confirm the evaluation decision", "Results". The flow starts when a user opens the Application evaluation dialog.
Diagram describing the business rule:

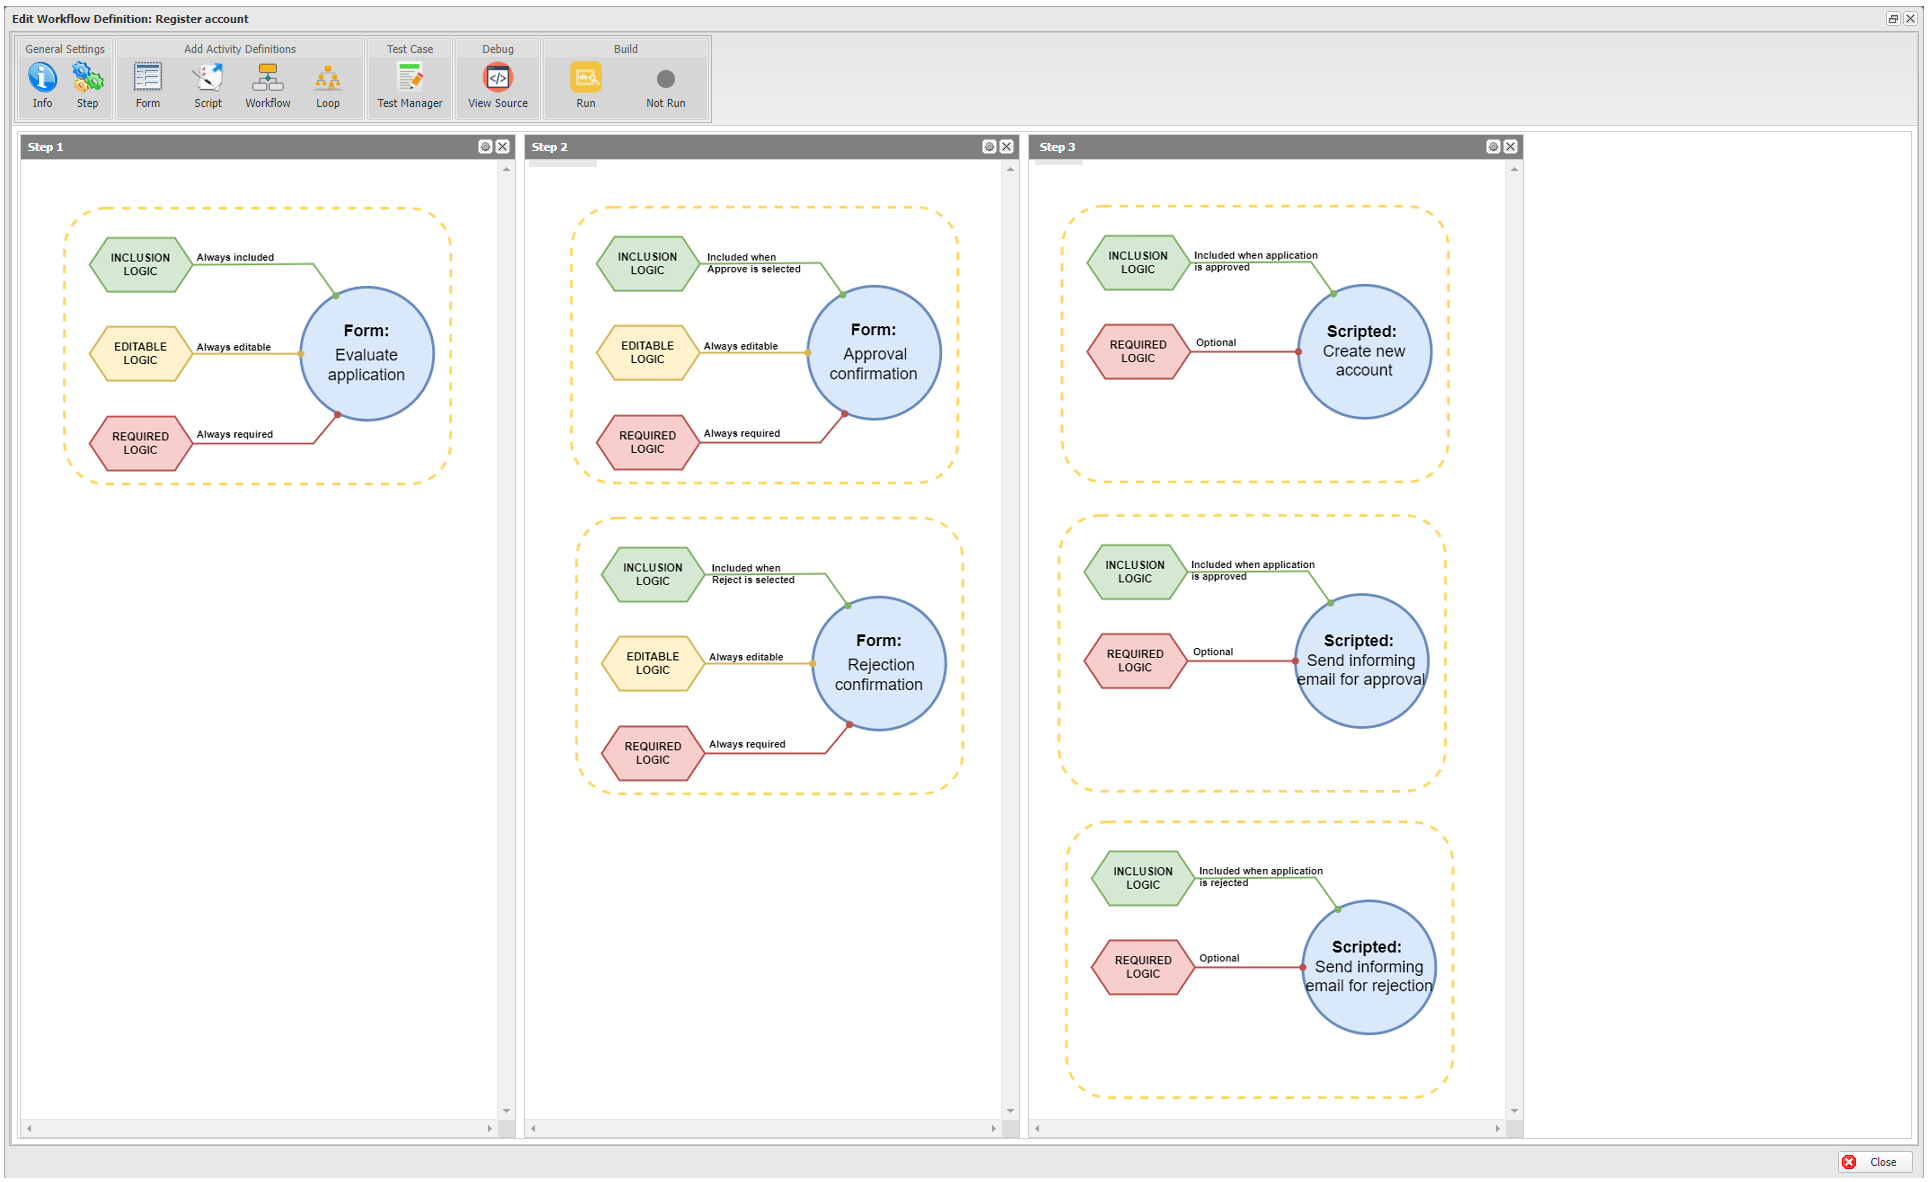
Workflow definition in Casewhere:

Step 1 - Evaluate an application
First of all, the user must open the evaluation dialog for an application s/he wants to evaluate . This flow is handled in Step 1 of Casewhere workflow with the Form activity called Evaluate application. In this activity, the logic configurations are as below:
Inclusion logic: The evaluation process is only able to start when this form is opened. Then, the Inclusion logic here is Always included.
Editable logic: The user can choose to approve or reject the application. Then, the Editable logic is Always editable
Required logic: The user must complete the evaluation to trigger the next step. Then, the Required logic is Always required
Step 2 - Confirm the evaluation decision
After evaluate the application, based on the decision, the corresponding confirmation dialog will be opened. If the decision is Approve, the Approval confirmation dialog will be opened. If the decision is Reject, the Rejection confirmation dialog will be opened. In Step 2 of Casewhere workflow, there are 2 form activities handling this business rule: Approval confirmation, Rejection confirmation. The logic configurations are as below
Form: Approval confirmation
- Inclusion logic: The form is only opened when the user selects to approve the application, so the Inclusion logic is Included when Approve is selected
- Editable logic: The user can choose to agree with the confirmation or decline it, so the Editable logic is Always editable
- Required logic: When the form is displayed, the user must complete the form to go to the next step. Then, the Required logic is Required when included
Form: Rejection registration
- Inclusion logic: The form is only opened when the user selects to reject the application, so the Inclusion logic is Included when Reject is selected
- Editable logic: The user can choose to agree with the confirmation or decline it, so the Editable logic is Always editable
- Required logic: When the form is displayed, the user must complete the form to go to the next step. Then, the Required logic is Required when included
Step 3 - Results
After the user confirms the evaluation decision, the corresponding action will be executed. If the application is approved, a new account will be created and an informing email for approval will be sent to the registrant. If the application is rejected, an informing email for rejection will be sent to the registrant. This part will be handled in Step 3 of Casewhere workflow with 3 scripted activities: Create new account, Send informing email for approval, Send informing email for rejection. The logic configurations are as below
Script: Create new account
- Inclusion logic: The script is run to create new account immediately after the application is approved. Therefore, the Inclusion logic is Included when application is approved.
- Required logic: This step is the ending step, it is not required to complete to go to next step. Therefore, the Required logic is Optional
Script: Send informing email for approval
- Inclusion logic: The script is run to send email to the registrant after the application is approved. Therefore, the Inclusion logic is Included when application is approved.
- Required logic: This step is the ending step, it is not required to complete to go to next step. Therefore, the Required logic is Optional
Script: Send informing email for rejection
- Inclusion logic: The script is run to send email to the registrant after the application is rejected. Therefore, the Inclusion logic is Included when application is rejected.
- Required logic: When the form is displayed, it is the ending step, it is not required to complete to go to the next step. Then, the Required logic is Optional