Deploy MongoDB replica set
Introduction
Replica sets should always have an odd number of members. This ensures that elections will proceed smoothly. For production deployments, you should maintain as much separation between members as possible by hosting the Mongod instances on separate machines. When using virtual machines for production deployments, you should place each Mongod instance on a separate host server serviced by redundant power circuits and redundant network paths.
When possible, use a logical DNS hostname instead of an IP address, particularly when configuring replica set members or sharded cluster members. The use of logical DNS hostnames avoids configuration changes due to IP address changes.
Before you can deploy a replica set, you must install MongoDB on each system that will be part of your replica set. To save effort and reduce the risk of misconfiguration, we recommend setting up one server and cloning it to create other replica set members. How to clone a VM is beyond the scope of this document.
More about the MongoDB replica set can be found here:
1. Create a replica set key file
To install MongoDB with a replica set, we need to generate a random string and store it in C:\keys\replicaset-keys.yaml. We will copy this key file to each MongoDB server for setting the replica set.
A key’s length must be between 6 and 1024 characters and may only contain characters in the base64 set. All members of the replica set must share at least one common key. You can generate the key following steps below:
Download OpenSSl from here.
Extract OpenSSL Zip and navigate to bin folder.
Open the PowerShell window and run the script below with path-to-key-file, which is the place that you will store the key file.
.\openssl rand -base64 756 > "path-to-key-file"
Limit access to this file so only Network Service and Administrator accounts can read from it.
2. Install MongoDB on each member
Install MongoDB
Download the binaries from the MongoDB Download Center. Double-click the .msi file and follow the Windows Installer steps to install MongoDB.
Make sure the following options are selected:
- [x] Install MongoD as a Service.
- [x] Run service as Network Service user.
Use a Data Disk to store logs and data. You must never use an OS Disk here.
Data Directory: "F:\MongoDB\Data".
Log Directory: "F:\MongoDB\Log".
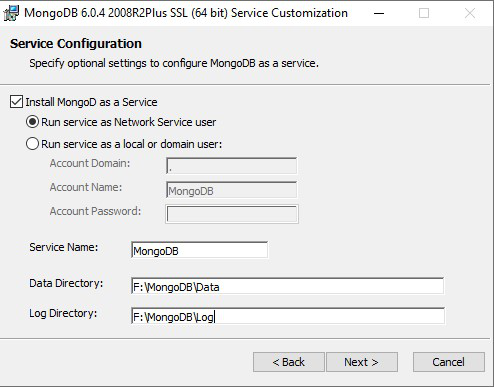
Let’s skip the option Install MongoDB Compass in the next step.
The following tools are needed to configure MongoDB in the next steps. Please download and install them:
- MongoDB 6.0+:
- Download and install Studio3T here. We recommend you set the Shell-metric view as preferred when you start using it.
- Download MongoDB Shell here](https://www.mongodb.com/try/download/shell). Extract the package and copy files in the folder into C:\Program Files\MongoDB\Server\x.y\bin.
- MongoDB < 6.0:
- Download and install Robo3T here.
Enable access control
Make sure to locate and open the folder where MongoDB is installed, which typically can be found at C:\Program Files\MongoDB\Server\x.y\bin.
Open the configuration file mongod.cfg and change the settings as below:
security.keyFile: The key file’s path. For example, "C:\keys\replicaset-keys.yaml".
replication.replSetName: Replica set name should have the information about the project and environment.
net.bindIp: Since it’s hard to foresee how many members and clients to support at this step, it is more flexible to set the binding to 0.0.0.0 and control database access at higher levels such as the machine’s Firewall, Network Security Group.
For example:
net:
  port: 27017
  bindIp: 0.0.0.0
security:
  keyFile: C:\keys\replicaset-keys.yaml
replication:
  replSetName: "cw-prod"
Finally, save your changes and restart the MongoDB service using Powershell:
net stop mongodb
net start mongodb
You can also restart MongoDB in Windows Services:
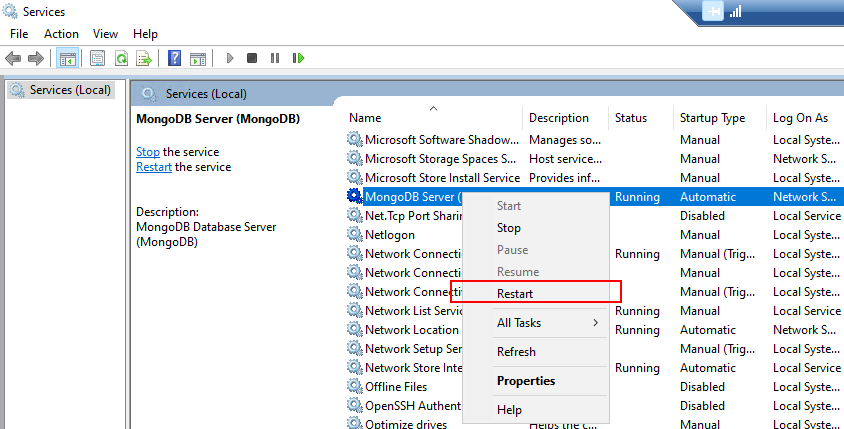
3. Initiate the replica set
Ensure all replica set members are ready and accessible
Do not start this step until you have all servers with MongoDB installed and configured.
For all servers, do the following:
Install and configure MongoDB as described in the previous steps
Add an inbound rule to the Firewall to have 27017 accessible from outside
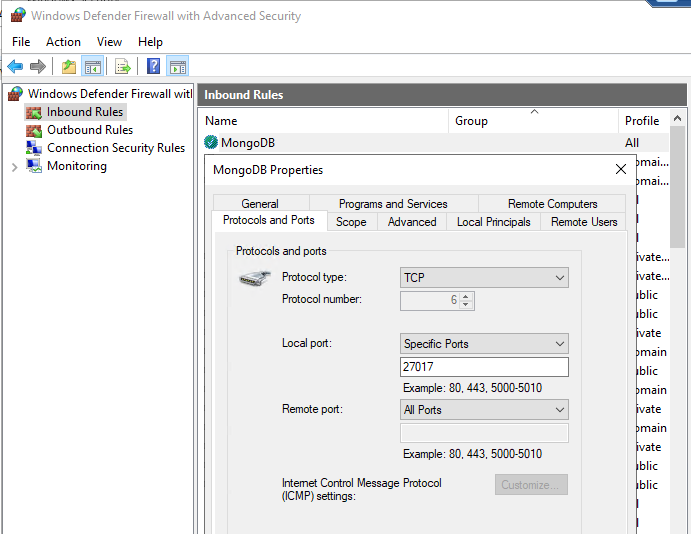
You can set up one server and then duplicate it to create others. Cloning a server is not covered in this document.
Initiate the replica set from the primary member
Navigate to the MongoDB Shell folder, which is typically located at C:\Program Files\MongoDB\Server\x.y\bin.
Connect to the MongoDB shell to interact with mongod instances over the localhost interface. You must run the MongoDB shell on the same physical machine as the mongod instance.
MongoDB 6.0+: Use the new mongosh.
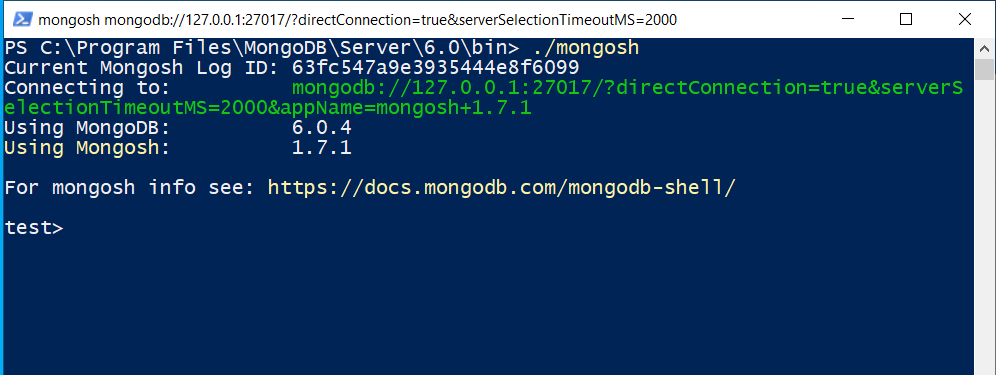
MongoDB < 6.0: Use the legacy mongo shell.

The localhost interface is available only until the first user is created for the deployment. It closes after the creation of the initial user
Run the rs.initiate() method
From the mongo shell, run the rs.initiate() method. The following example initiates a three-member replica set with an arbiter:
rs.initiate( {
   _id : "cw-prod",
   members: [
      { _id: 0, host: "cw-prod-mongo1.casewhere.db:27017" },
      { _id: 1, host: "cw-prod-mongo2.casewhere.db:27017" },
      { _id: 2, host: "cw-prod-mongo3.casewhere.db:27017", arbiterOnly: true }
   ]
})
_id: The replica set name that we configured in mongod.cfg in the previous step.
members[]: It is recommended to use hostnames for production environments. For development and testing, you can use IP addresses.
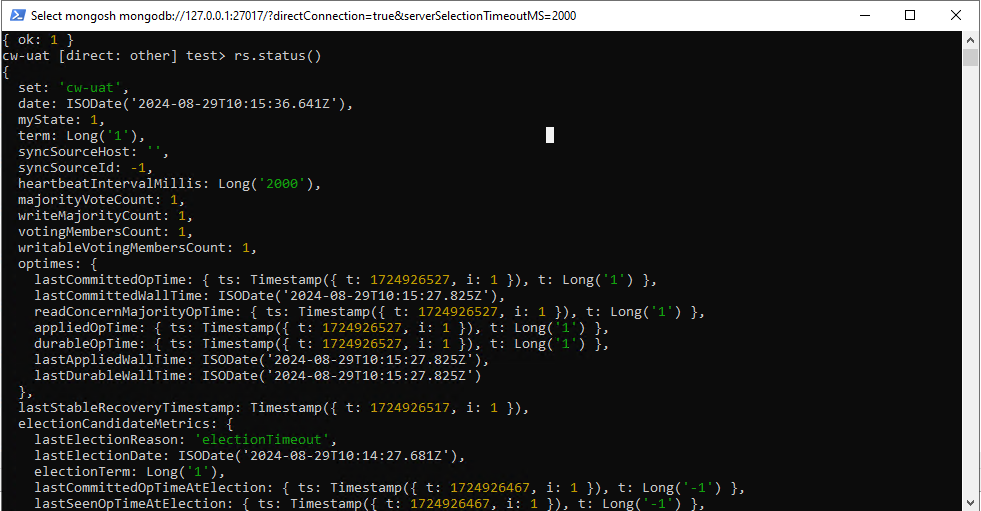
If the replica set is created successfully, the following result will be returned.
{ ok: 1}
Verify replica set
You can run rs.status() to verify the status of the replica set.
4. Create users
The localhost interface is only available when no users have been created for the deployment.
Create the admin user
First, use the MongoDB Shell to connect to the primary node. Use the command rs.status() to identify the primary member. Then, execute the following command to create the admin user.
admin = db.getSiblingDB("admin")
admin.createUser({
  "user": "admin",
  "pwd": "<password>",
  "roles" : [
    {
      "role" : "readWriteAnyDatabase",
      "db" : "admin"
    },
    {
      "role" : "dbAdminAnyDatabase",
      "db" : "admin"
    },
    {
      "role" : "userAdminAnyDatabase",
      "db" : "admin"
    },
    {
      "role" : "clusterAdmin",
      "db" : "admin"
    },
    {
      "role" : "backup",
      "db" : "admin"
    },
    {
      "role" : "restore",
      "db" : "admin"
    }
  ],
  "mechanisms" : [
    "SCRAM-SHA-1",
    "SCRAM-SHA-256"
  ]
})
Be sure to use a password manager to generate and store the password for the admin user. This user account will be used to administer the database and create other user accounts.
Authenticate as the admin user
Follow the steps below to authenticate using the admin user:
Using Studio 3T
- Click the Connect button in the ribbon, then click New Connection.
- Select Manually configure my connection settings and click Next.
- Enter the Connection name. On the Authentication tab, select Basic (SCRAM-SHA-256) as the authentication mode, then enter the Username and Password; also, use admin for Authentication DB.
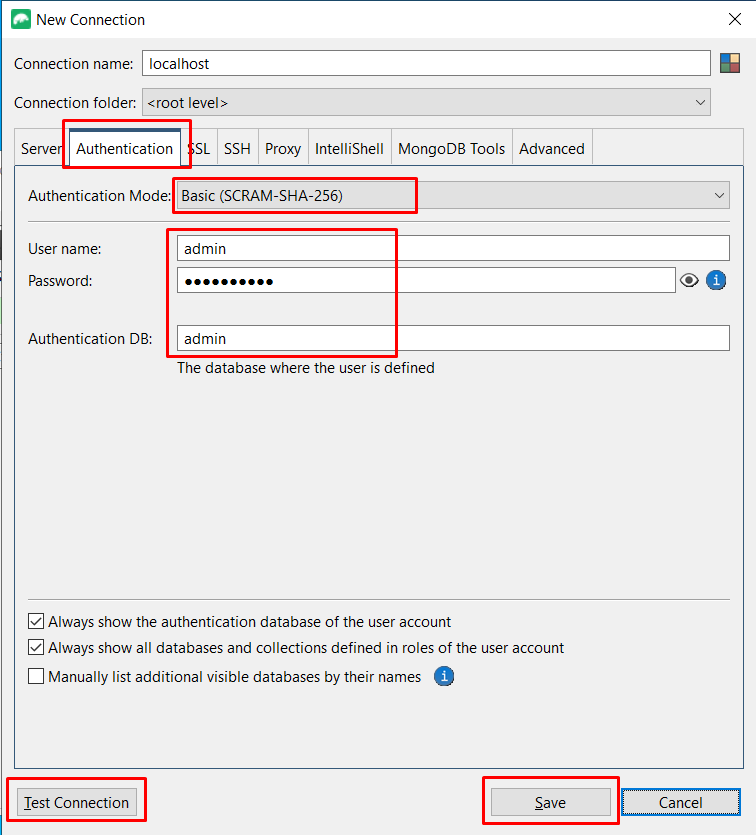
Click Test Connection to verify the connection to MongoDB. Ensure that all statuses are OK.
Click Save to create the connection.
Using Robo3T
Edit the localhost connection.
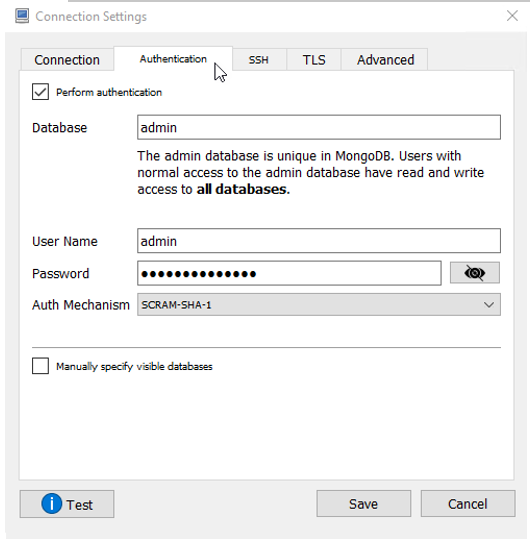
In the Connection Settings dialog, navigate to the Authentication tab and enable Perform authentication.
Enter User Name and Password using the admin credentials.
Create additional users for your deployment
You should never use the admin account for your applications. Follow the least privilege principle by creating roles defining the precise access rights required for specific users. Then, create users and assign them only the roles necessary for their tasks. A user can be either a person or a client application. For the Casewhere deployment, you will need at least two users.
- Web application account: The account is primarily used by Casewhere web applications and should have both read and write access to all databases.
admin = db.getSiblingDB("admin")
admin.createUser({
  "user": "webapp",
  "pwd": "<enter your password>",
  "roles" : [
    {
      "role" : "readWrite",
      "db" : "CasewhereEvents_PROD"
    },
    {
      "role" : "readWrite",
      "db" : "CasewhereData_PROD"
    },
    {
      "role" : "readWrite",
      "db" : "CasewhereFileStorage_PROD"
    },
    {
      "role" : "readWrite",
      "db" : "CasewhereHangfire_PROD"
    },
    {
      "role" : "readWrite",
      "db" : "CasewhereKeys_PROD"
    }
  ],
  "mechanisms" : [
      "SCRAM-SHA-1",
      "SCRAM-SHA-256"
  ]
})
- Logging account: For security purposes, no one should be able to modify the log data once it is saved to the database.
admin = db.getSiblingDB("admin")
admin.createRole(
   {
     role: "cwlog",
     privileges: [
       {
           resource: { db: "CasewhereLog_PROD", collection: "" },
           actions: [ "listDatabases", "createCollection", "listCollections", "listIndexes", "createIndex", "dropIndex", "find", "insert" ]
       }
     ],
     roles: []
   }
)
admin.createUser({
  "user": "loguser",
  "pwd": "<enter your password>",
  "roles" : [
    {
      "role" : "cwlog",
      "db" : "admin"
    }
  ],
  "mechanisms" : [
      "SCRAM-SHA-1",
      "SCRAM-SHA-256"
  ]
})
It is recommended to include environment names such as DEV, TEST, and PROD in the database name. Passwords should be generated and managed using a password manager application.
5. Connection strings
Assuming the replica set cw-prod has the following members:
cw-prod-mongo1.casewhere.db:27017 (Data-Bearing)
cw-prod-mongo2.casewhere.db:27017 (Data-Bearing)
cw-prod-mongo3.casewhere.db:27017 (Arbiter)
The connection string will look like the example below. As you can see, there is no need to include the Arbiter in the connection string.
mongodb://username:password@cw-prod-mongo1.casewhere.db:27017,cw-prod-mongo2.casewhere.db:27017/dbname?authSource=admin&replicaSet=cw-prod&retryWrites=true&w=majority
If the username or password includes the following characters, those characters must be converted using percent-encoding:
: / ? # [ ] @
The
dbnameshould be replaced with the following values:CasewhereEvents_PROD
CasewhereData_PROD
CasewhereFileStorage_PROD
CasewhereHangfire_PROD
CasewhereKeys_PROD
CasewhereLog_PROD