Web trigger
Introduction
There are many ways a workflow can be triggered in Casewhere. With web triggers, you can expose a Web API endpoint for your external systems to trigger a workflow in Casewhere. Using web triggers is one of the most popular ways to integrate other systems with Casewhere.
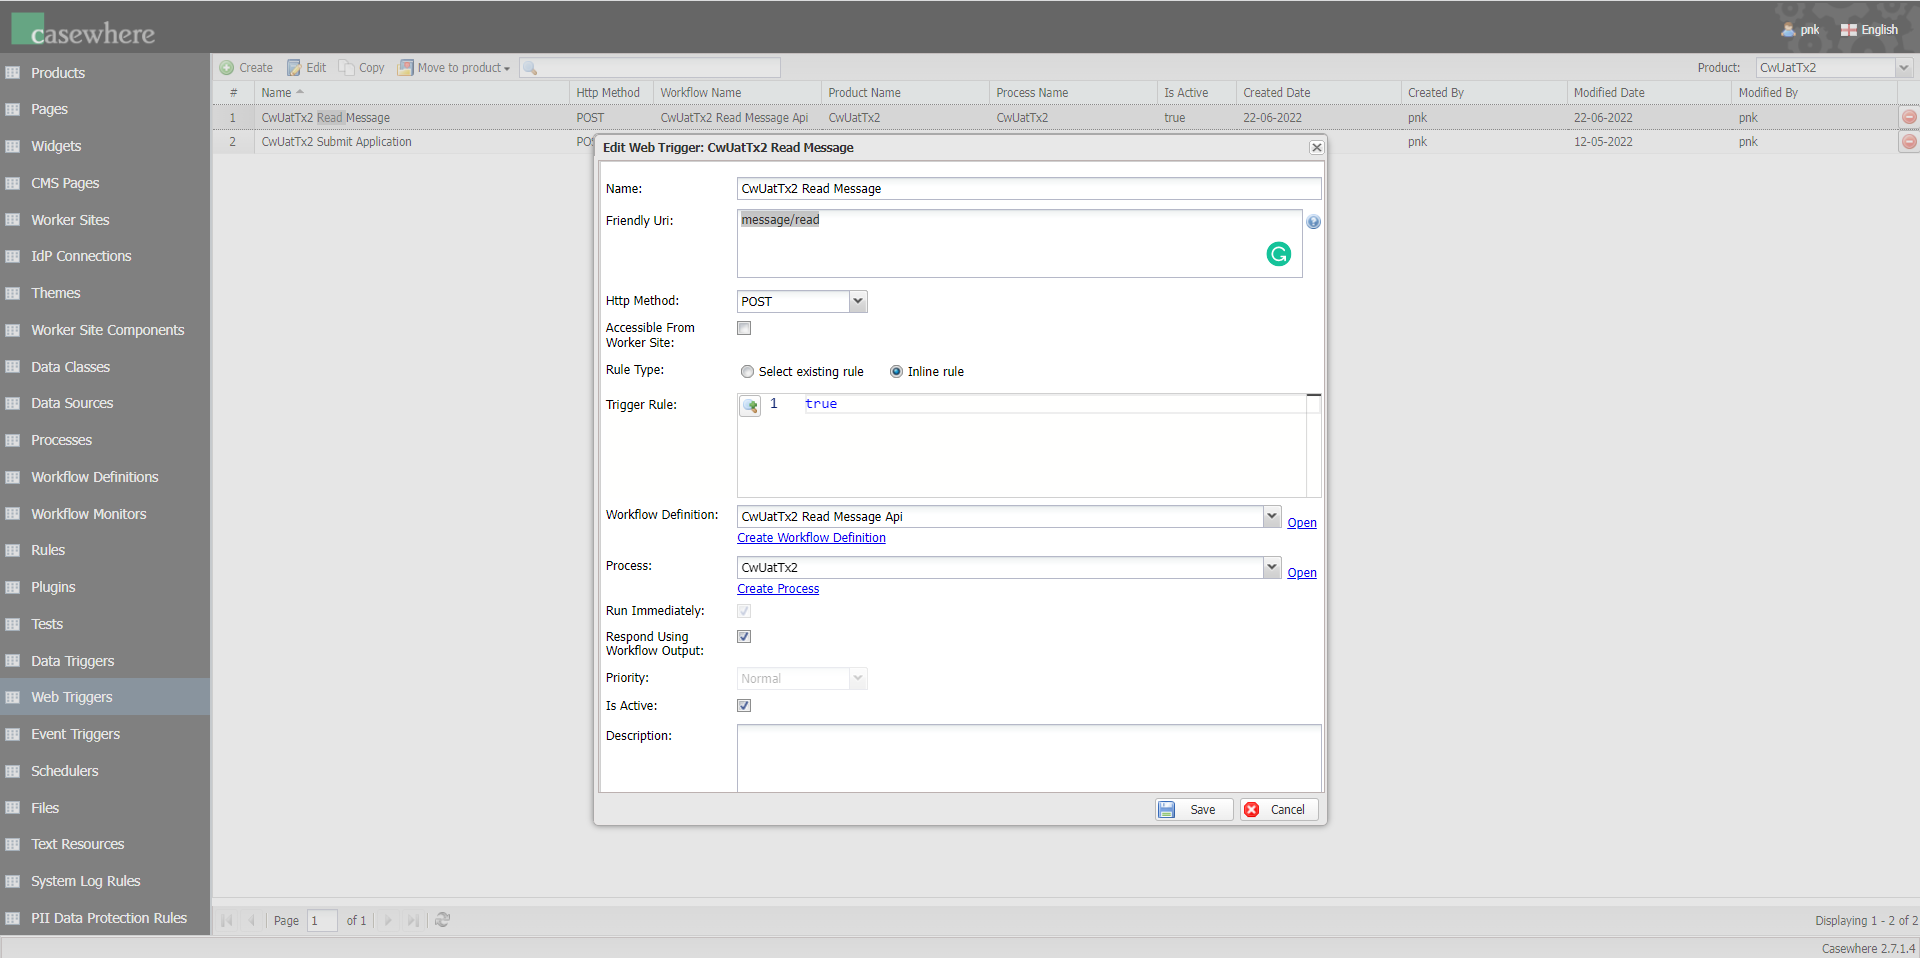
In Casewhere Admin, navigate to Web Triggers. From here, you can create, edit and manage web triggers like any product resource.

Basic configuration
The following information is required to configure a web trigger:
Name: The web trigger name must be unique. It's possible to execute a web trigger using its name through the endpoint
https://{your-casewhere-api-domain}/external/v0.1/{web-trigger-name}.Http Method: The HTTP request methods. You can read more here.
- Initially, Casewhere only supports POST and GET. From version
2.7.2, Casewhere supports two more methods, PUT and DELETE.
- Initially, Casewhere only supports POST and GET. From version
Rule: To validate the web request and determine where or not a workflow should be executed. If the validation fails, Casewhere will respond with status code 400. Learn to write web trigger rule here. While you can write an expression using Inline rule, it's recommended to create a separate rule for reuse.
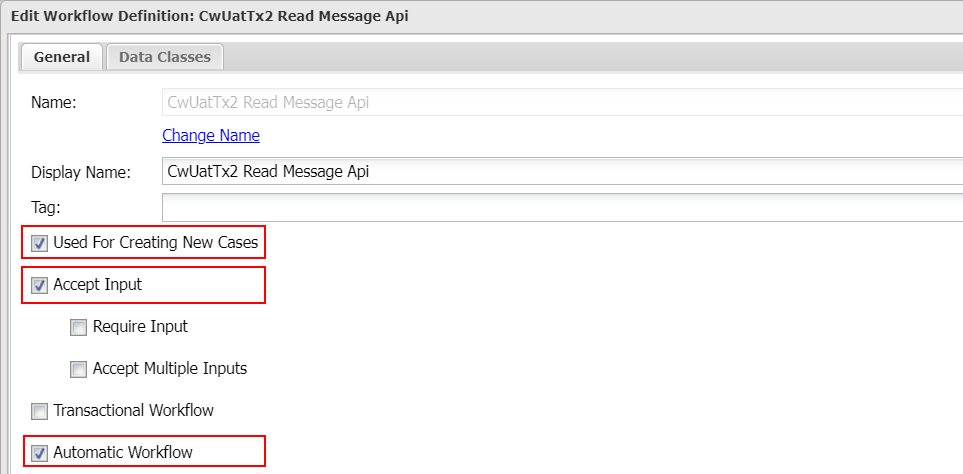
Workflow Definition: The triggered workflow definition. Casewhere only accepts automatic, create-case workflow definitions for using with web triggers. The workflow definition must also accept input in order to access the posted data.
Process: The process in which the triggered workflow will run. A new case is created every time Casewhere executes a web trigger.
Run Immediately: To determine whether or not Caseware should execute the workflow in the same context with the web request or should Casewhere queue the workflow. Please note that if you choose to queue the workflow, it's not possible to send response data to clients from the workflow because Casewhere will respond immediately right after it queues the workflow.
Friendly Uri
It's possible to access web triggers in a more friendly way using custom URIs. A web trigger can accept many URIs as needed.

You then can access the web trigger using the endpoint https://{your-casewhere-api-domain}/dynamic/{friendly-uri}. For example, you can access the above example via:
- https://api-local.casewhere.com/dynamic/post/
- https://api-local.casewhere.com/dynamic/post/all
- https://api-local.casewhere.com/dynamic/post/casewhere/all
- https://api-local.casewhere.com/dynamic/post/casewhere/platform/all
Currently, Casewhere supports the friendly URI of the web trigger with up to four segments.
Parameterized URI
Casewhere provides the solution to work with the URL parameters. For example, if a pattern /dynamic/vehicle_inspections/{id} is configured for a web trigger, when you request to endpoint /dynamic/vehicle_inspections/12345, Casewhere will trigger that web trigger, and set the parameter id with value is 12345 in the ctx.RouteParameters.
- Create a web trigger with
idas its parameter. This web trigger will trigger a workflow with a simple scripted activity use a warning log to write thectx.RouteParametersinto the System Log.


- Make a request to the endpoint
/dynamic/vehicle_inspections/12345

- Observe the
ctx.RouteParametersvalue in the System Log

Invoke web triggers from a worker site
Turning on the setting Accessible From Worker Site will enable Casewhere to run the web-trigger rule in the worker-site context when the request is sent from a worker site. You then can use the @user keyword to verify user's claims. Read more about rules and user context here.
Casewhere provides a web-trigger client so you can use to invoke web triggers from worker site widgets. Please read more here.
Work with query string
There are two ways to retrieve data in Casewhere.
Approach 1: Using Web API
Please note that the
IWebApiis available only when the setting Run Immediately is on.
The below code can be used in a scripted activity to retrieve data from the request query string.
var webApi = ctx.Use<IWebApi>();
// assuming we have the query string "?categoryIds=2&categoryIds=3&productId=1"
var queryString = webApi.GetQueryString();
var categoryId1 = queryString["categoryIds"].ToArray()[0]; // 2
var categoryId2 = queryString["categoryIds"].ToArray()[1]; // 3
var productId = queryString["productId"].FirstOrDefault(); // 1
Approach 2: Using ctx.Parameters
Form version 2.7.2, Casewhere will parse the query string and store the values in the workflow, which is persisted in database, so it's possible to retrieve the query string value using ctx.Parameters even when the workflow runs in background.
var categoryId1 = ctx.Parameters["categoryIds"][0]; // 2
var categoryId2 = ctx.Parameters["categoryIds"][1]; // 3
var productId = ctx.Parameters["productId"]; // 1
Respond data
There are two ways to set web response in the triggered workflow.
Approach 1: Using Web API
Please note that the
IWebApiis available only when the setting Run Immediately is on.
You can set the response from the triggered workflow using IWebApi.CreateResponse in a scripted activity.
var webApi = ctx.Use<IWebApi>();
var data = new { FirstName = "John", LastName = "Doe" };
webApi.CreateResponse(data);
Furthermore, you can also set the file stream as the response of the triggered workflow using IWebApi.CreateFileResponse in a scripted activity as the code below:
var documentApi = ctx.Use<IDocumentApi>();
var webApi = ctx.Use<IWebApi>();

string content = "File created by scripted DOWNLOAD FILE BY STREAM";
string filePath =  Path.GetDirectoryName(Path.GetRandomFileName());
string fileName = "FileByStream.txt";
string downloadFileName = "FileByStream-Download.txt";
string fullPath = Path.Combine(filePath, fileName);

bool existsFolder = System.IO.Directory.Exists(filePath);
if(!existsFolder) System.IO.Directory.CreateDirectory(filePath);

using (StreamWriter sw = new StreamWriter(fullPath))
{
    sw.WriteLine(content);
    sw.Close();
}

Stream fs = File.OpenRead(fullPath);
webApi.CreateFileResponse(downloadFileName, fs);
To work with the file stream response, you need to enable the Run Immediately setting and disable the Respond Using Workflow Output setting.
Approach 2: Using workflow output
Enable the setting Respond Using Workflow Output, so Casewhere will respond to clients using the output from the triggered workflows.
You can set the output for the triggered workflow using the code below in a scripted activity.
ctx.Output = data;
Queue triggered workflows
When the setting Run Immediately is turned off, Casewhere will queue the workflow and execute it in the background, separated from the context of the web request. You can control the order the workflow is dequeued by configuring Priority.
When a workflow runs in the background, that workflow can't interact with web-context APIs, including IWebApi.
Web API
Casewhere provides a set of APIs for developers to work with the HTTP requests and responses directly. You can read more here. Please note that these APIs are available only when the setting Run Immediately is on.
Support XML input/output
Casewhere also support XML type for input and output of the Web trigger. We can access the XML input via ctx.Input.
- Create a request to a web trigger with the Accept header is application/xml.

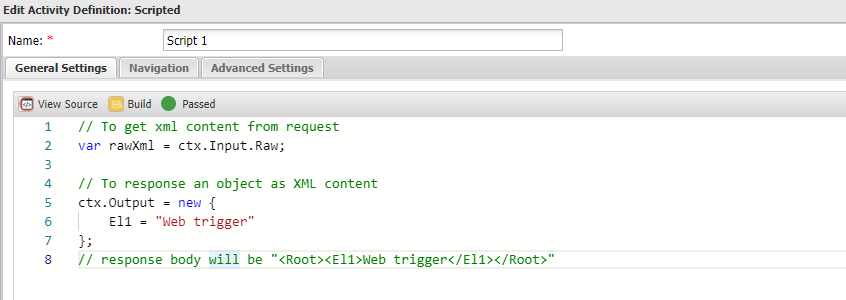
- Then create a web trigger to trigger a workflow with a simple scripted activity as below:
// To get xml content from request
var rawXml = ctx.Input.Raw;

// To response an object as XML content
ctx.Output = new {
    El1 = "Web trigger"
}
// response body will be "<Root><El1>Web trigger</El1></Root>"

Please note that Casewhere will always wrap the XML output inside a root element as:
<Root>
    {Output content}
</Root>
- Request to above web trigger with the input:
<Root>
    <Root>
        <El1>Web Trigger</El1>
    </Root>
</Root>

- The response will be:
<Root>
    <Root>
        <El1>Web trigger</El1>
    </Root>
</Root>

